A full bust adjustment is one of the most common adjustments that curvy sewists tend to make, but it’s not as scary as it sounds! Here’s how to do an FBA on a darted or dartless bodice, the stress-free way.
Here at Cashmerette, we include three cup sizes (C/D, E/F, G/H) with all of our patterns so that you can get a great fit right out of the packet, and most people don’t have to do an FBA. But if you’re using a pattern that is drafted with a smaller cup size than what you need, or you are significantly bigger than Cashmerette cup sizes, you’ll likely need to do an FBA.
In this tutorial, we’re showing how to do a full bust adjustment on a pattern that has a bust and/or waist dart, or no dart at all. If you’re new to FBAs, check out this guide to figure out whether you need to make this adjustment, and how much circumference you’ll need to add.
Let’s get started!
Preparing for an FBA
Here’s what you need on hand for doing your FBA: your front bodice pattern, some tracing paper (we like Swedish tracing paper, but anything that you can see through will do), a pen or pencil, a ruler, scissors, and some tape. It helps to be working on a cutting mat or a surface that you can tape things down onto temporarily—you’ll see why pretty soon.
We always recommend tracing your pattern piece before starting to cut into it. This is so that you can refer to the original piece later on if needed—once you cut into the real thing, it’s hard to go back.
How to do a darted or dartless FBA
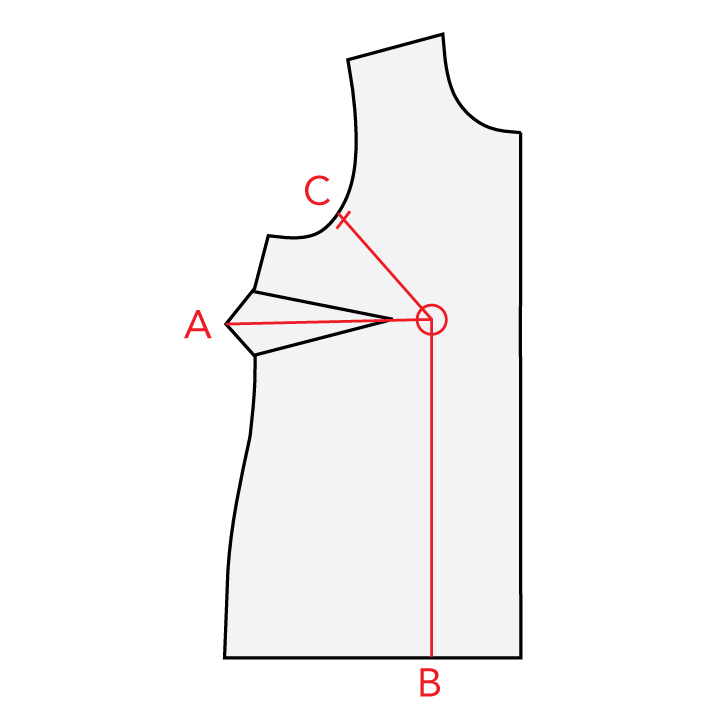
1. Start by drawing three lines onto the front pattern piece:
- The first line (marked A in the illustration below) goes through the center of the bust dart to the bust apex. If your pattern has no dart, draw a line from the bust apex horizontally across to the side seam.
- The second line (B) goes from the bust apex down to the waist, parallel to the center front. If your pattern has a waist dart, this line will likely go through the middle of the waist dart.
- The third line (C) goes from the bust apex up diagonally to the armscye, about a third of the way along the armscye from the underarm. The exact point isn’t important, so no need to stress about this bit. Mark the seam allowance at the top of this line at the armscye.
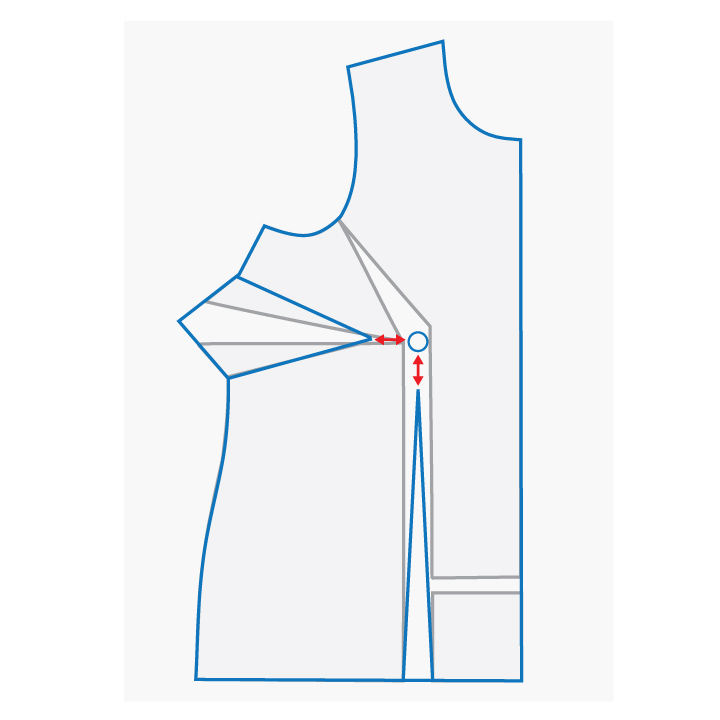
2. Now it’s time to cut. First, cut up line B to the apex, and continue cutting up line C, stopping at the armscye seam allowance. Snip into the seam allowance from the other side, leaving a little hinge there. (Don’t worry if you accidentally cut through the hinge—you can just put a piece of tape over it and cut into it again.)
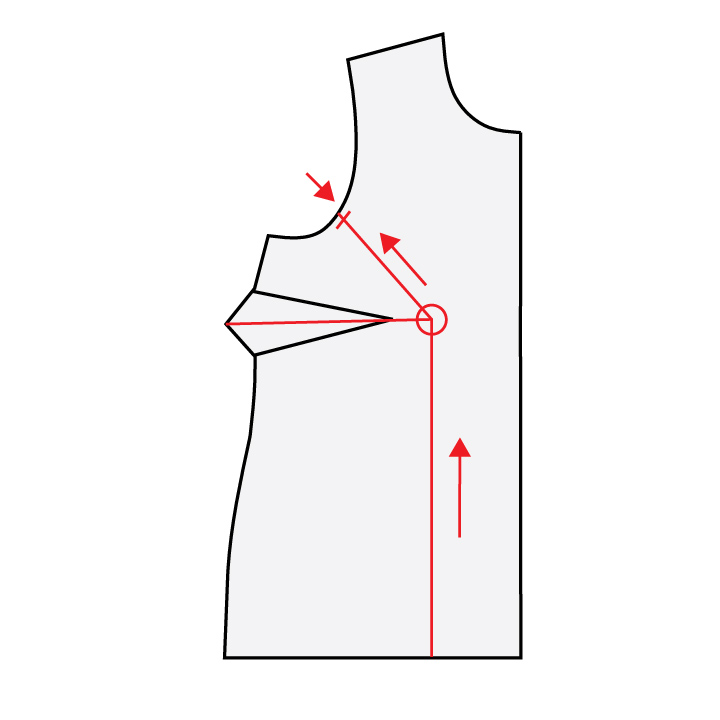
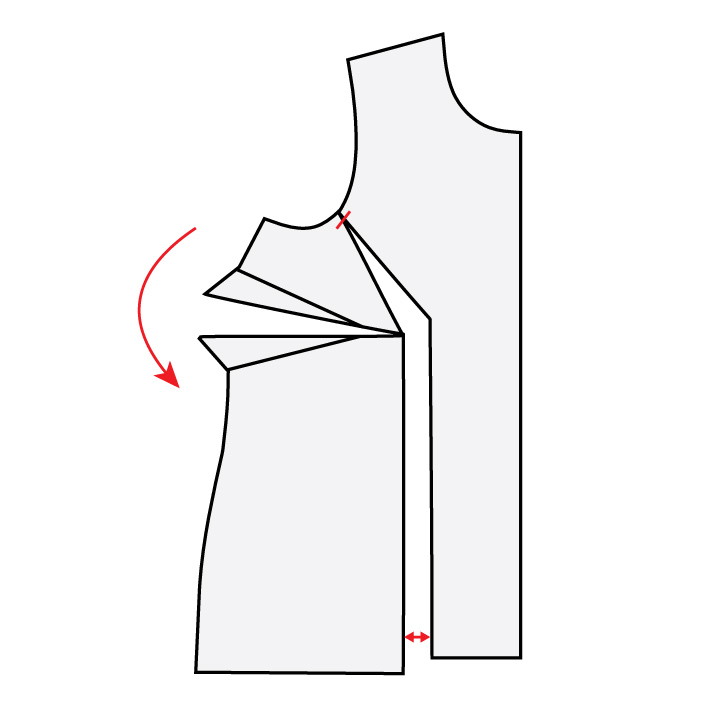
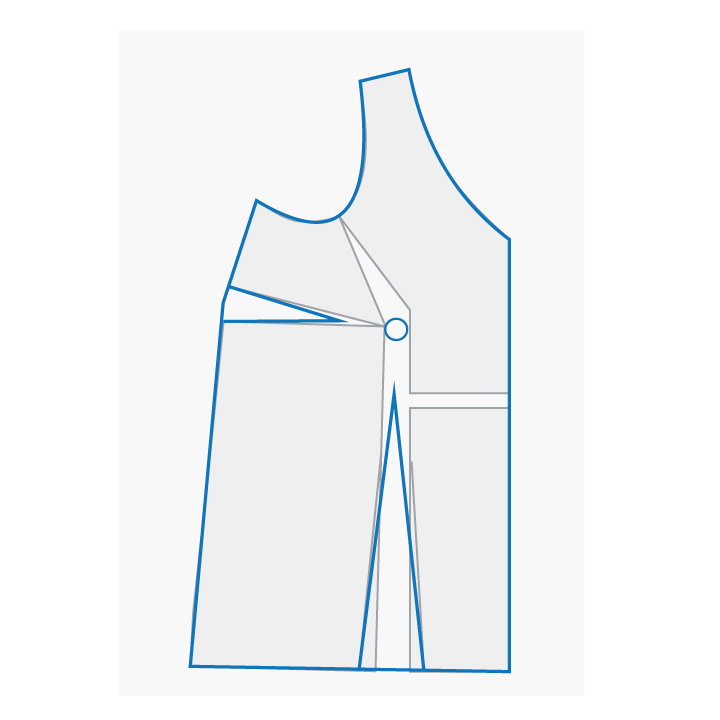
3. Keeping the hinge intact, we’re going to swing the side section open.
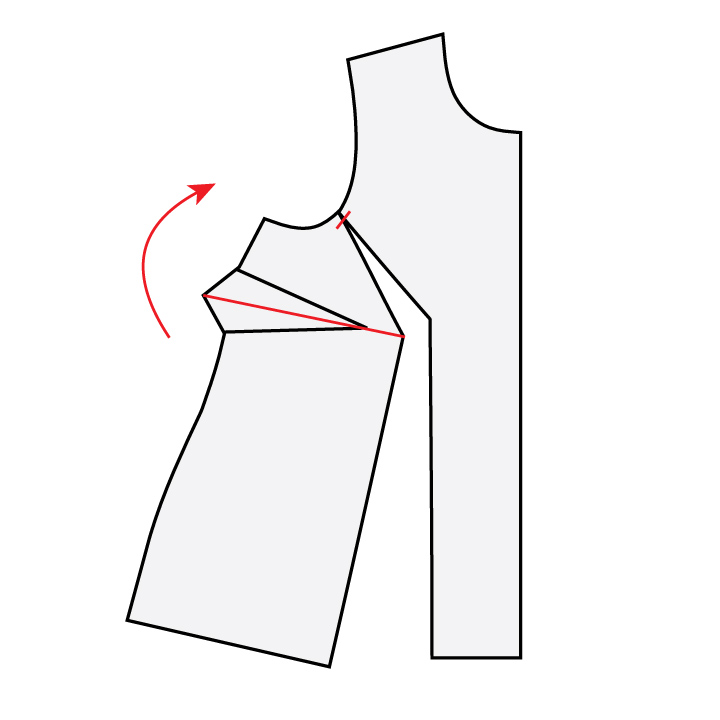
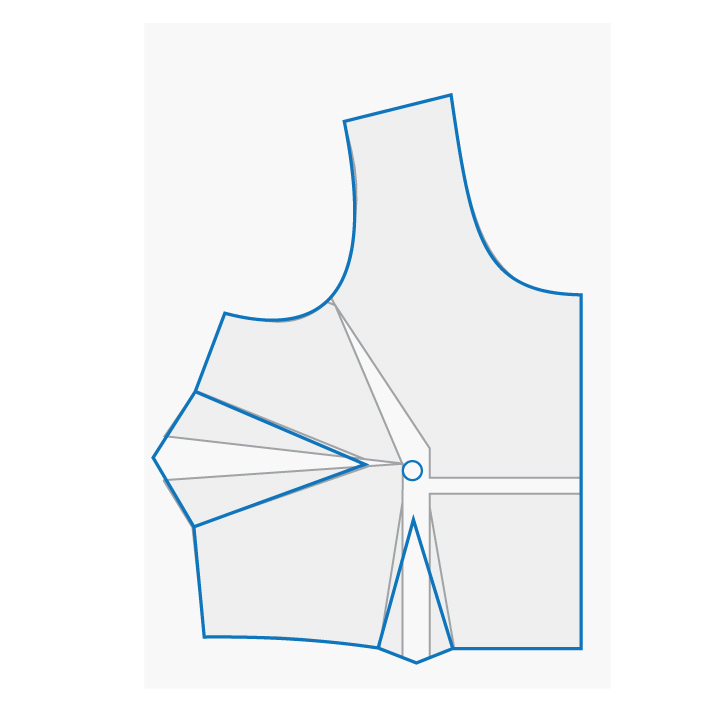
4. Next we’re going to cut line A, starting at the side seam and leaving a small hinge at the end. Gently swing the bottom piece down, and then adjust the pieces so that the vertical gap now has parallel sides. This should be the width that you calculated that you need for your full bust adjustment, so you may need to adjust it a bit at a time until it’s the right width. Let’s tape that down.
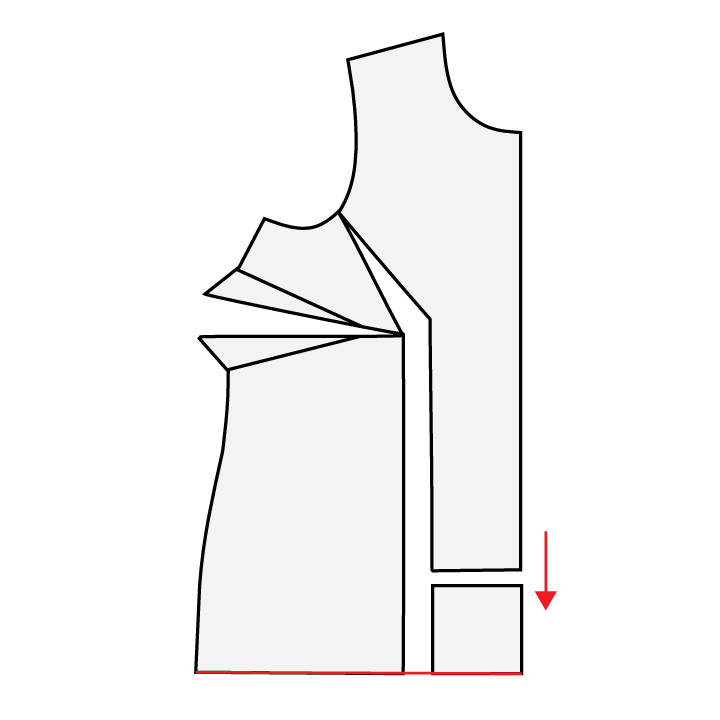
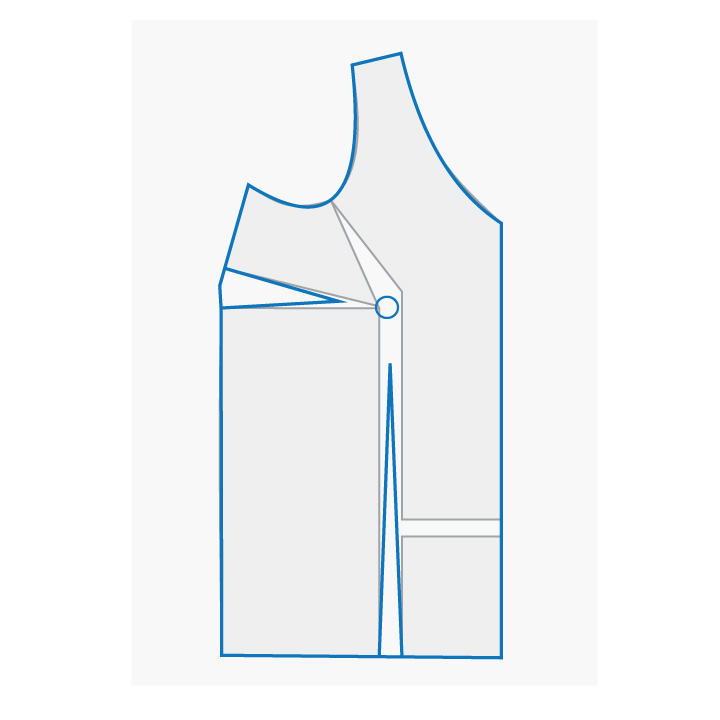
5. So as you can see, we’ve now added the width we needed in the bust, made the bust dart bigger to better fit a larger bust, and adjusted the armscye for better bra coverage. But you’ll notice that our hem edge isn’t even, so next we need to cut a horizontal line across the center piece somewhere below the apex. We’ll slide that down to be in line with the side piece at the bottom. This vertical length covers your bust and keeps your hem level across the front.
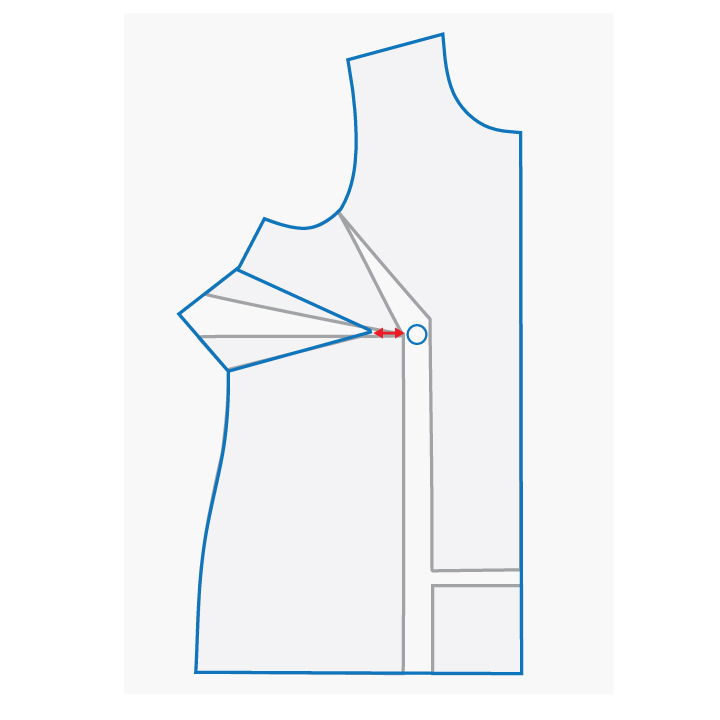
6. Finally, we can trace our new shape onto tracing paper, and then we need to check back in with our darts—more on that below.
Patterns with a single bust dart
To create the new bust dart, start at the side seam with the original dart legs, but end the dart two inches from the bust apex (which is now lower and further out than it was before—this is what we want, since larger boobs are almost always lower). True up the dart legs.
You’ll notice that we also added more width to the waist and hip, and if you don’t want or need that extra width, you can remove it by either:
1. Trimming it off at the side seam
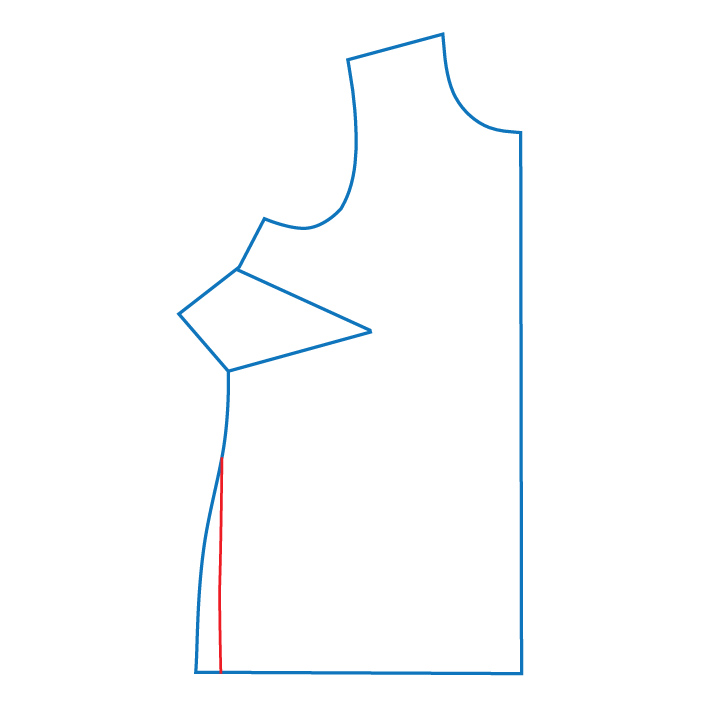
2. Adding a waist dart, which should be the width of the vertical gap that was created when we did our FBA. The classic way to do this is to end the dart 2 inches below the apex, but depending on the look you’re going for, you may want it to be shorter.
Patterns with a single waist dart
To create your new waist dart, start at the old dart legs and finish it at the same height as before, but in the middle of the opening created by the FBA.
You’ll also now have a bust dart, which you can draw in starting at the edges of the new opening and ending 2 inches from the bust apex. You can remove the bust dart by rotating it into the waist dart, but patterns that only have a waist dart often don’t have great fit for larger busts, so we recommend keeping it at the bust to better fit your shape.
Patterns with a bust and waist dart
Create your new bust dart by drawing in the original dart legs starting at the side seam, but end the dart 2 inches from the bust apex, then true up the dart legs.
Create your new waist dart by drawing in the old dart legs and finishing the dart the at same height as the original dart, but in the middle of the new opening.
Patterns without darts
Start by drawing in the new bust and waist darts, even if you intend to remove them. Draw in the dart legs at the edges of the new openings and end your darts 2 inches from the bust apex.
You can then choose to remove them by rotating your bust dart to your waist dart, and then not sewing the waist dart. We recommend leaving in at least the bust dart for better shaping for larger busts, but it’s up to you.
And that’s all there is to it! Not to bad, right? Because we’re only adding width in the front of the garment (where your bust is), we don’t need to change any of the other pieces including the back piece.
Want to learn more about fitting clothes to your body?
Check out our Fitting for Curves: Pattern Adjustments for the Upper Body online workshop.
Thanks for this tutorial. I read a view FBA tutorials on the web and I think your way of changing the darts is different from the way most dressmakers do it, right?
I will try your method on my next dress, it has a bodice with darts. I have a big difference between bust and waist measurements, so I always need to choose a smaller size and do the FBA on my patterns.
Very helpful tutorials. Thank you
I have tried a few fba s and my pattern ends up with flappy material at the neck. High bust 44 full bust 51
Hi Loretta, the neck area shouldn’t be affected much by an FBA. Are you following the steps we show in this tutorial? You may need to a gaping neckline adjustment, separate from the FBA.
-Ayelet at Cashmerette