Welcome back to part two of making my own sandals! (need to catch up? Part 1 is here).
So, once all the pieces were cut and dyed, it was on to construction, and losing whatever was left of my fingertips after all that skiving (it’s seriously hard work, people!).
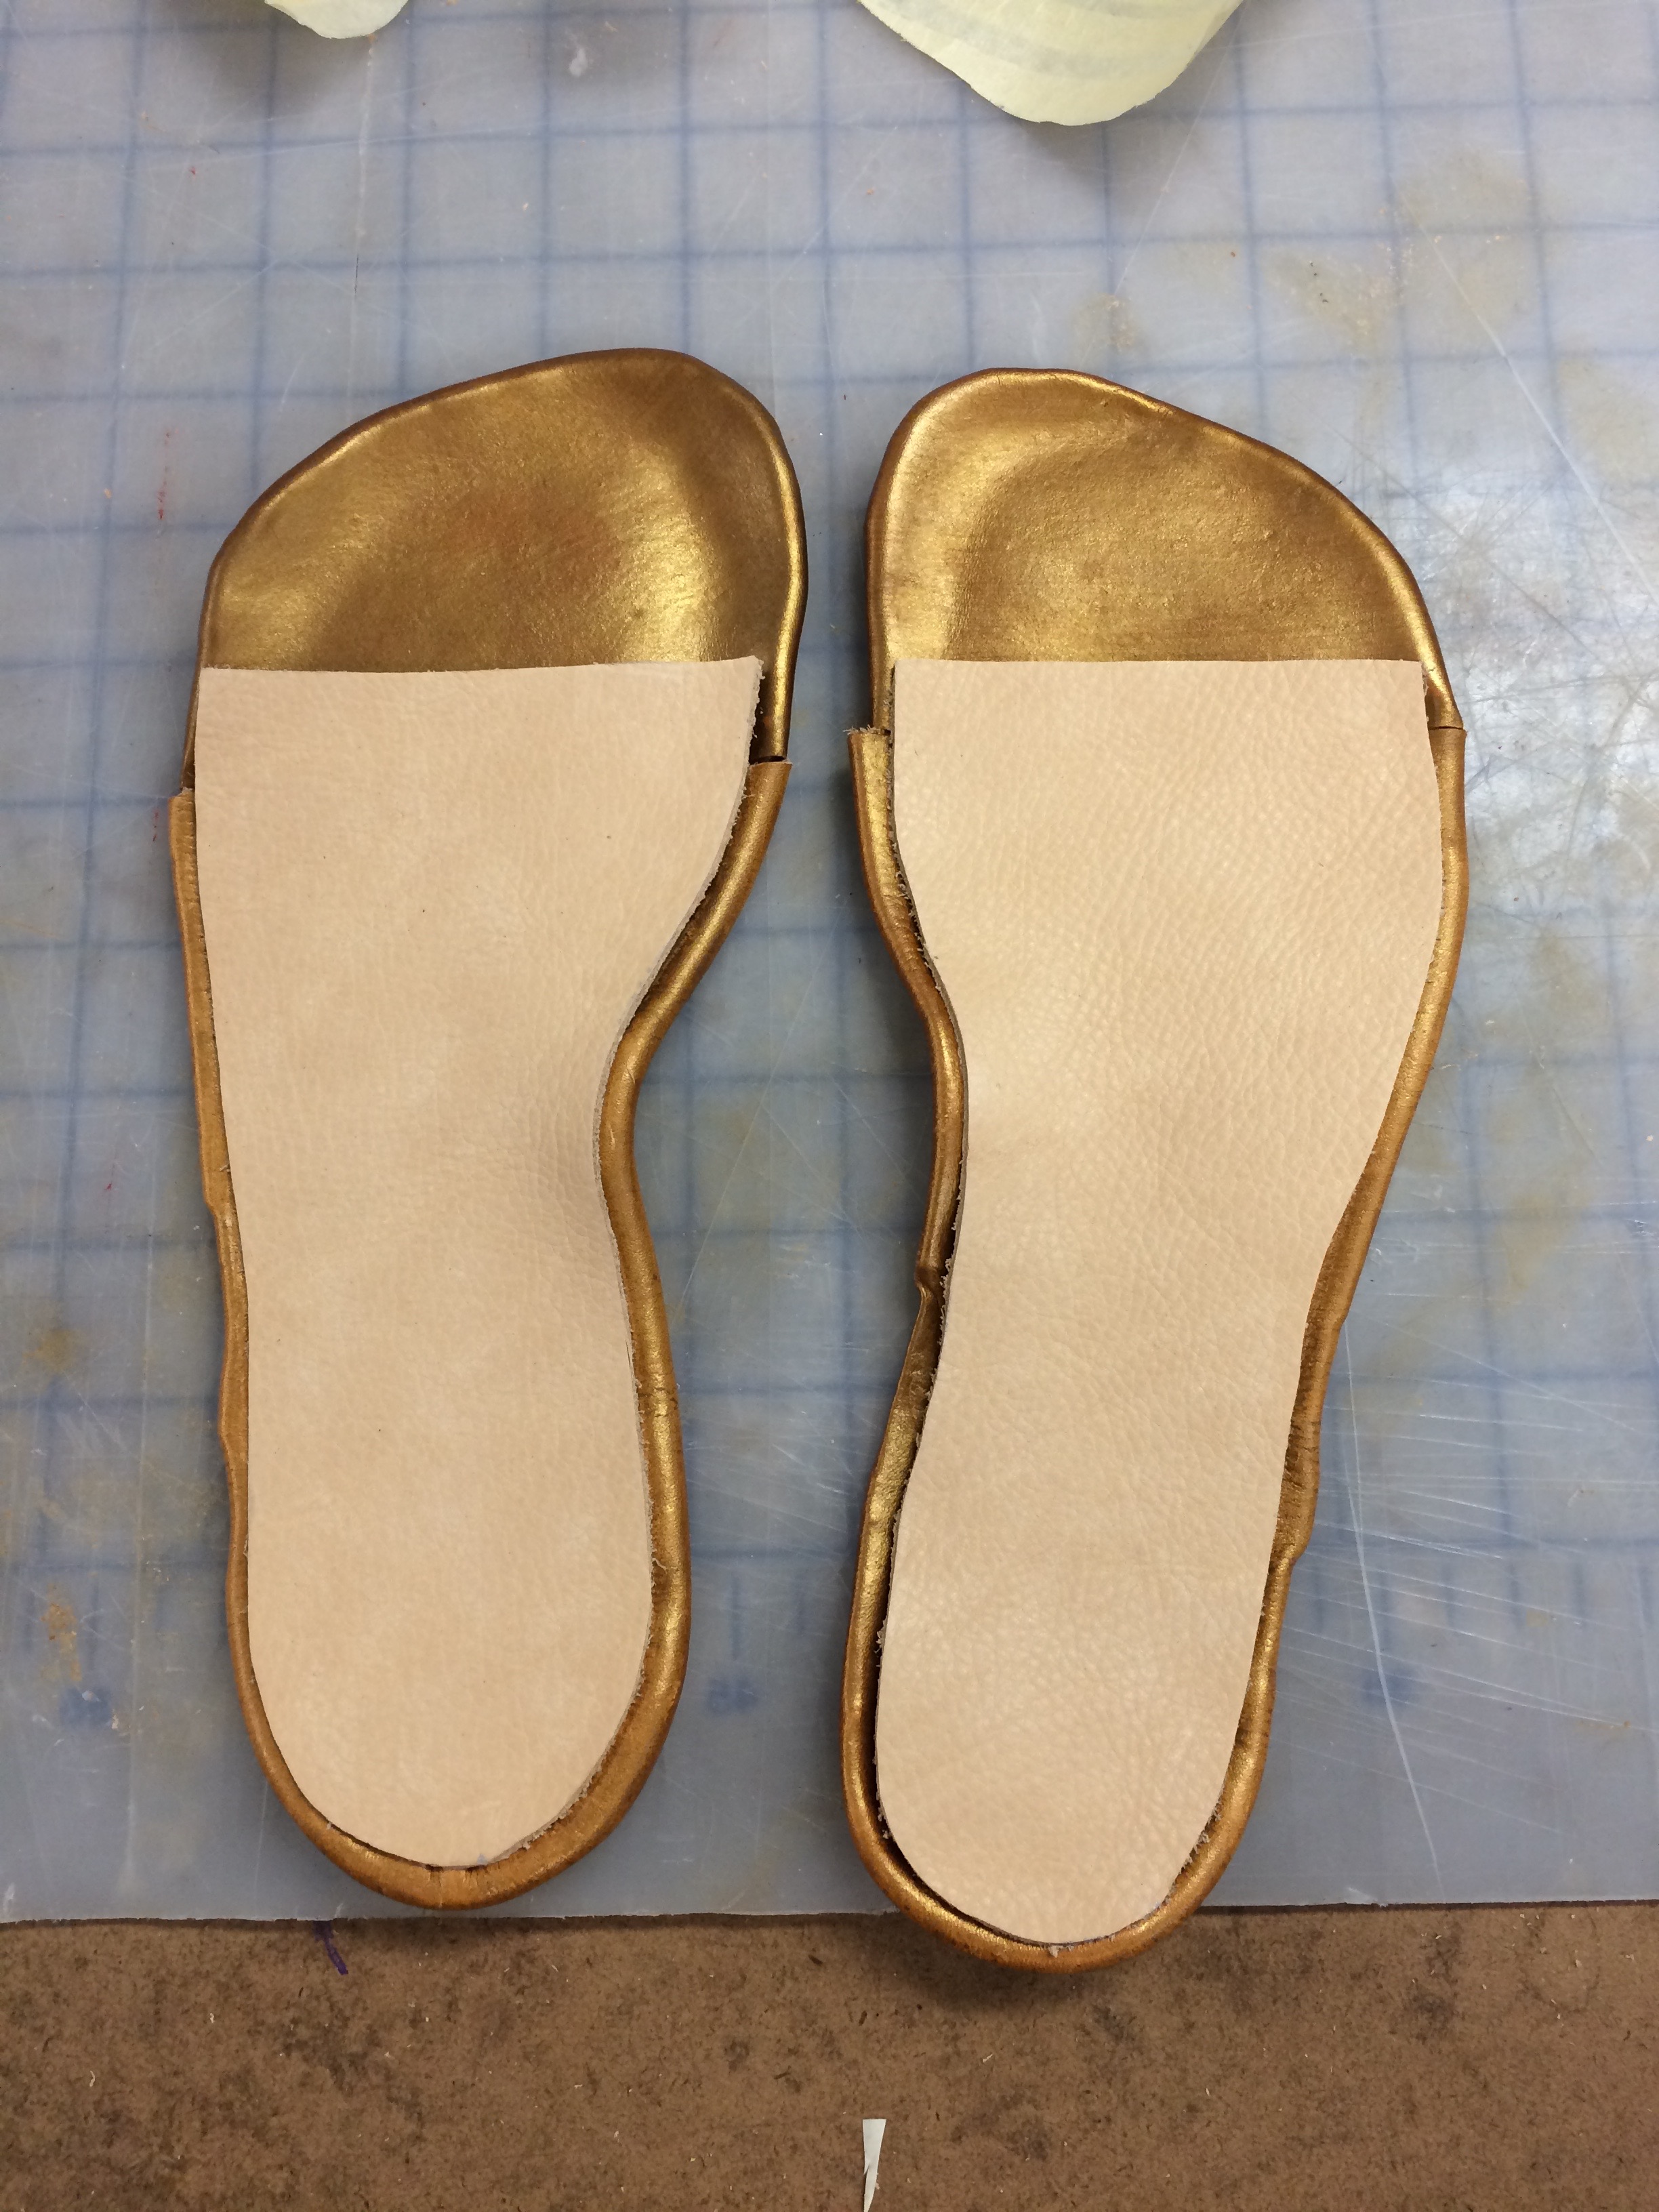
As I am soft and tender of feet, I decided to add a bit of padding which was as simple as cutting down a foam insole, and worked really well.

A vat load of toxic glue was used to wrap the gold toe-bit around the toe of the sole area – it’s super difficult to make it smooth and wrinkle-free (lots of prodding with an awl and sore fingers), and clearly I could improve those skills… But hey, not bad for my first pair! I also wrapped the edge of the sole in gold leather too, and then had to gouge out little bits where the straps wrapped around underneath.
We used masking tape to make patterns for each step, which was really effective. For the step below, I was making a pattern for the insole….
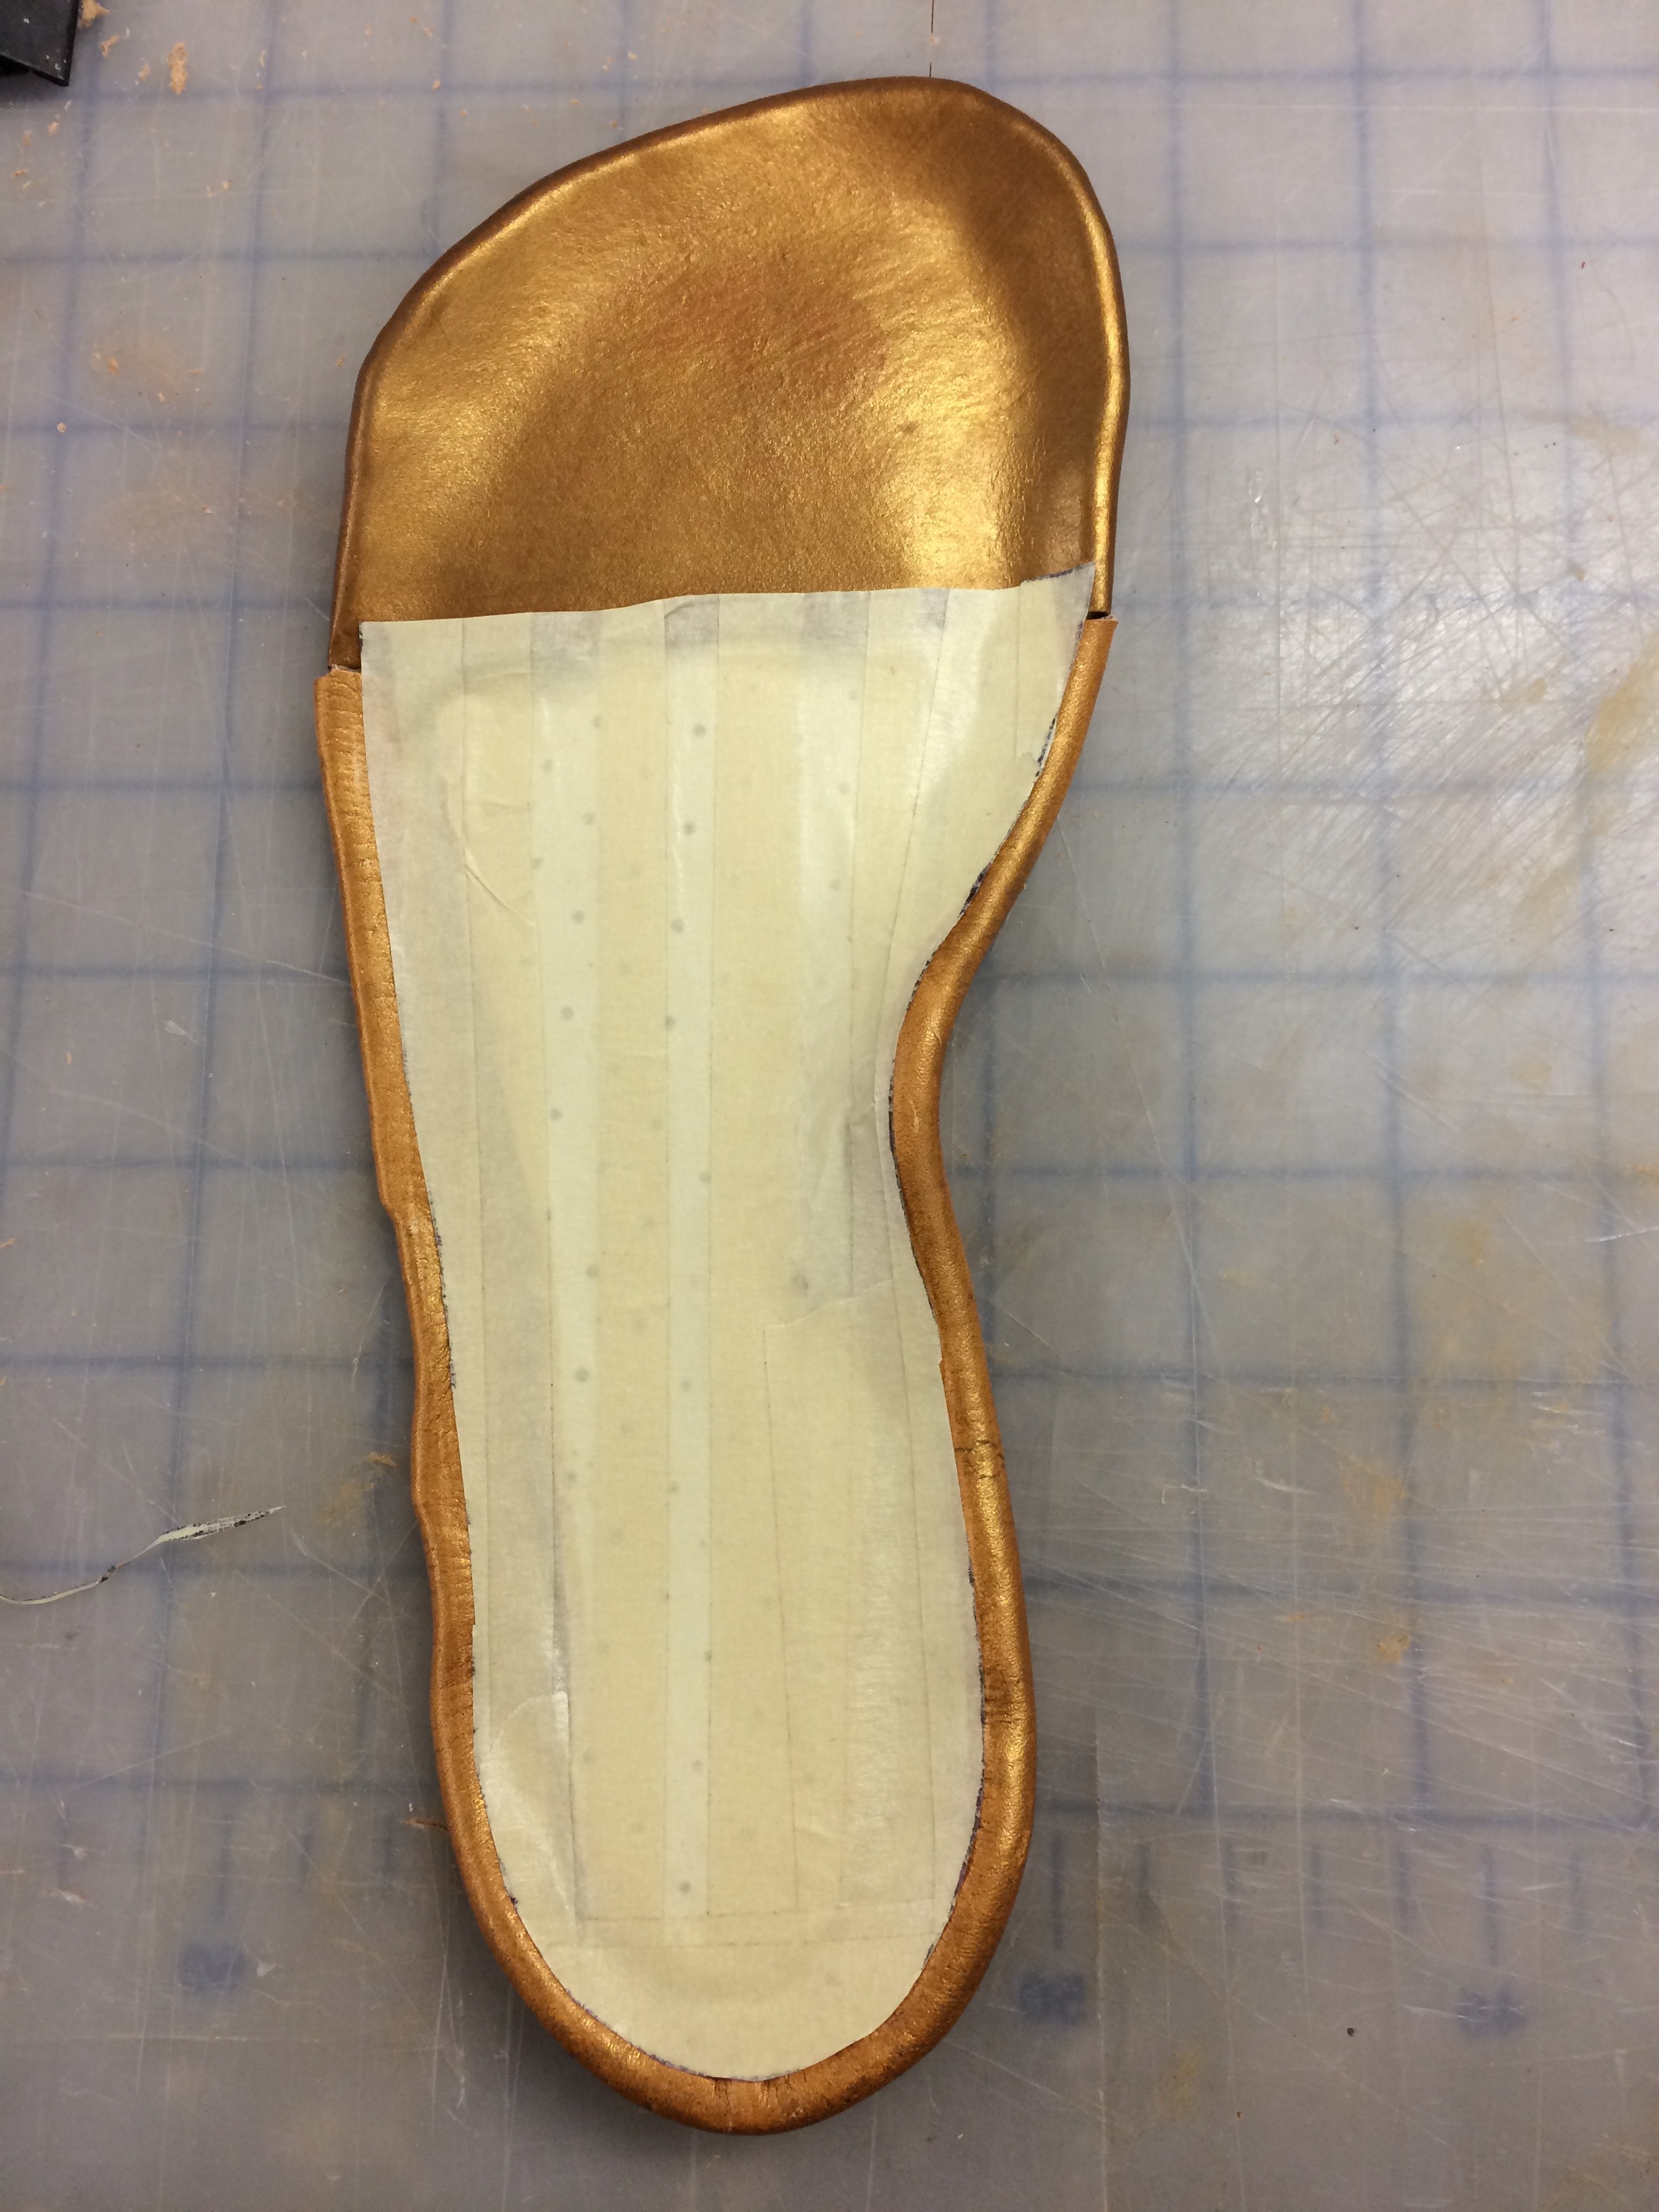
… which we see here!

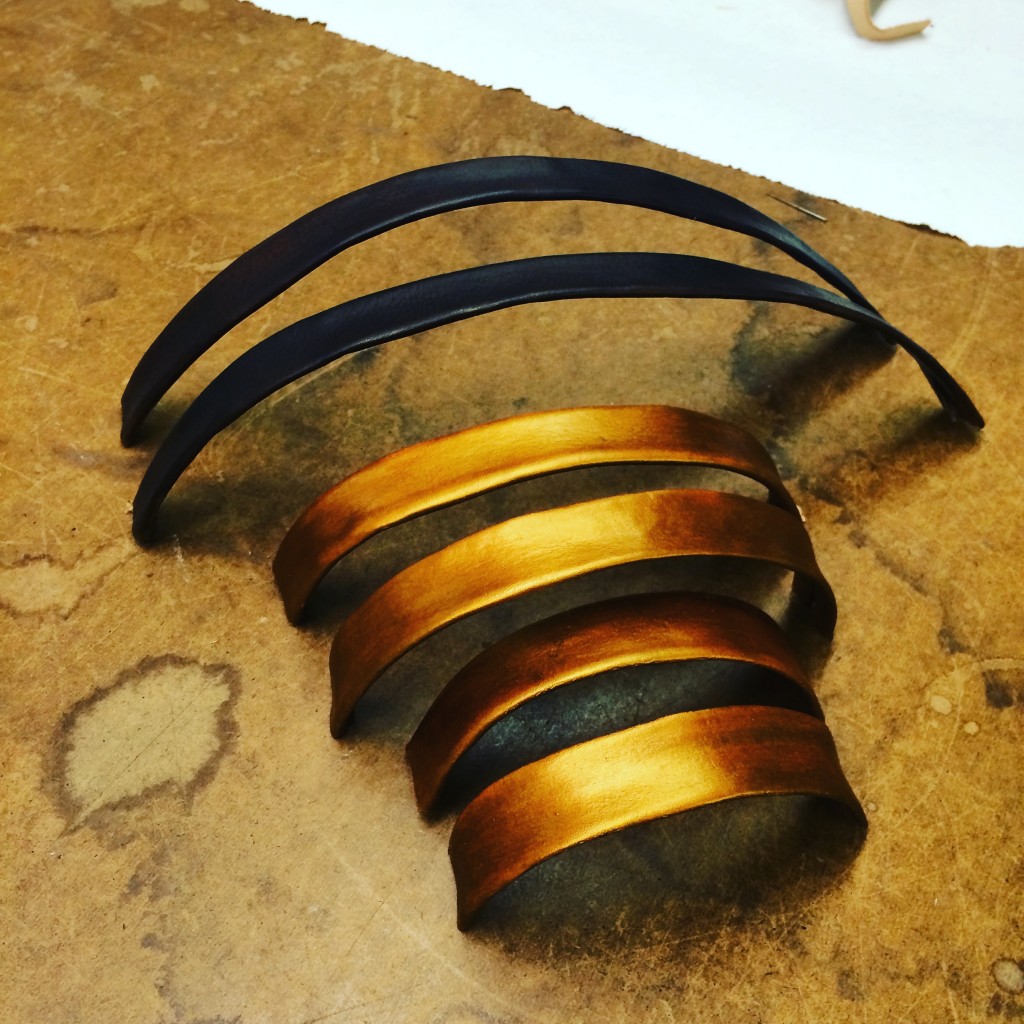
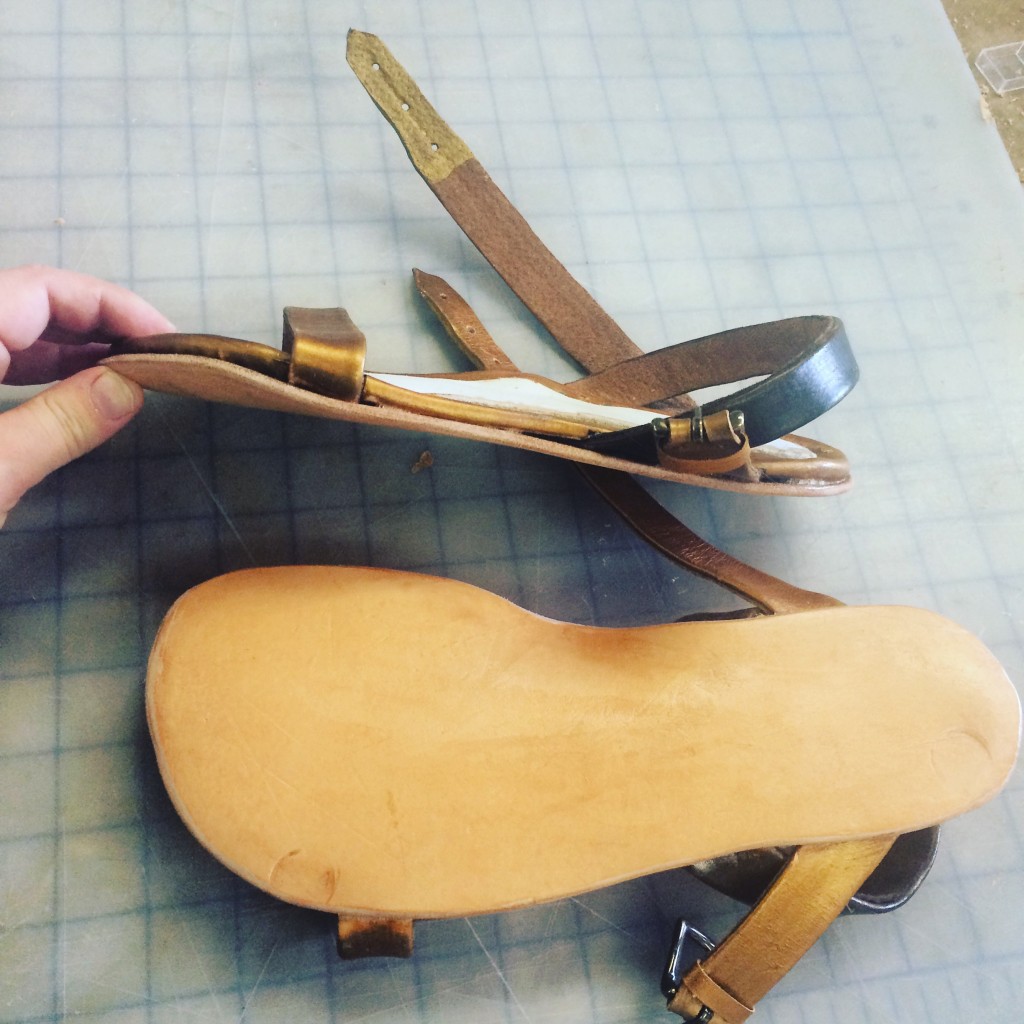
Back to the straps, I decided that I wanted a smooth look with no stitching, so I basically created leather bias tape. Easier said than done! It involved skiving the leather down until it was very thin, then glueing, folding it over, and hammering with a soft mallet. I loved the final look, and luckily had more dye on hand to patch up all the mallet dings.
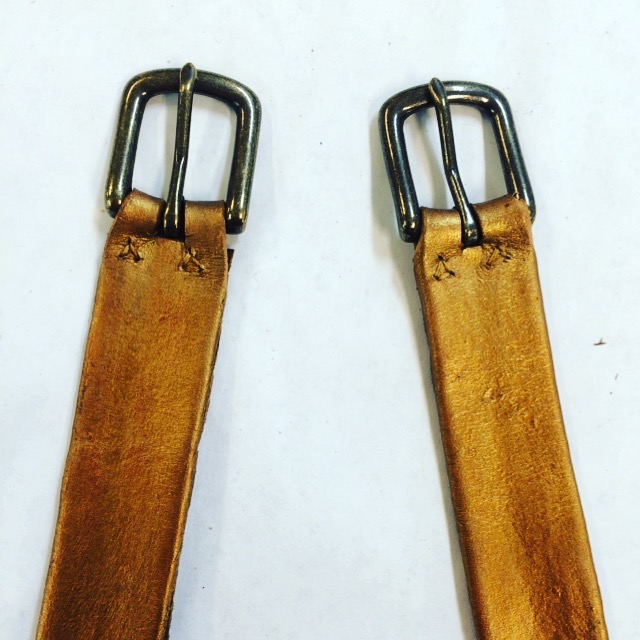
When I went to put the buckles on the straps I realised that I’d made a bit of a measurement error.. but managed to work around it by cutting a bit off each side of the strap towards the end, and I think it isn’t too noticeable.
First strap to go on was the vamp strap over the toe:
 And then the ankle ones went on!
Next up, shanks went on the back of the heel to stiffen the sandals – these were actual fiberglass which we cut off a roll, heated up, and left to set so they go super hard. Then, tons more skiving and insets of leather to make the bottom of the sandals flat.
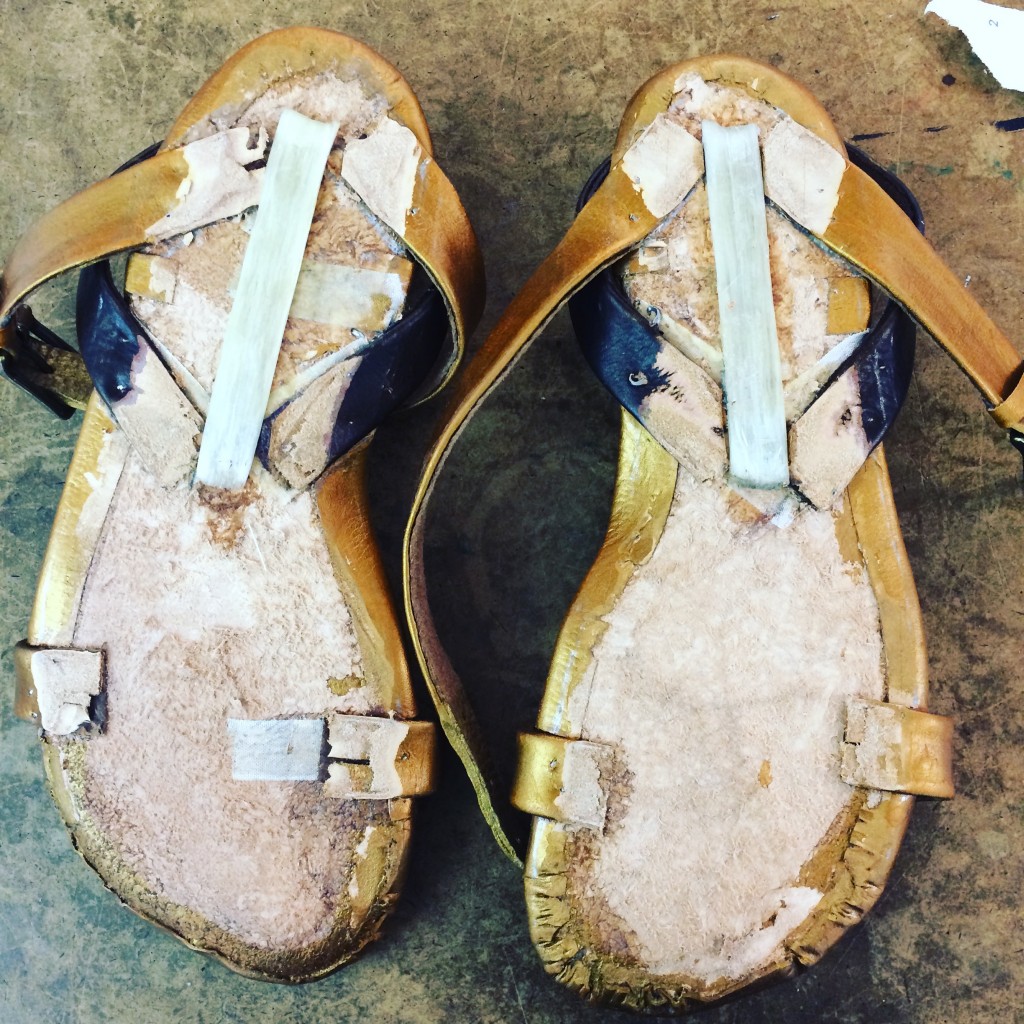
Then, on with the final soles! To make the edges nice, we used sandpaper, and then a piece of paper and water, which surprisingly polished them up into a lovely gloss. I nailed down all the straps with little tacks, and glued the insoles in; then, cut a little flat heel out of very hard plastic, and glued and nailed that on.
Oh, and then there was tassel making! I used a bit of purple suede and made little gold leather rings to hold them on.
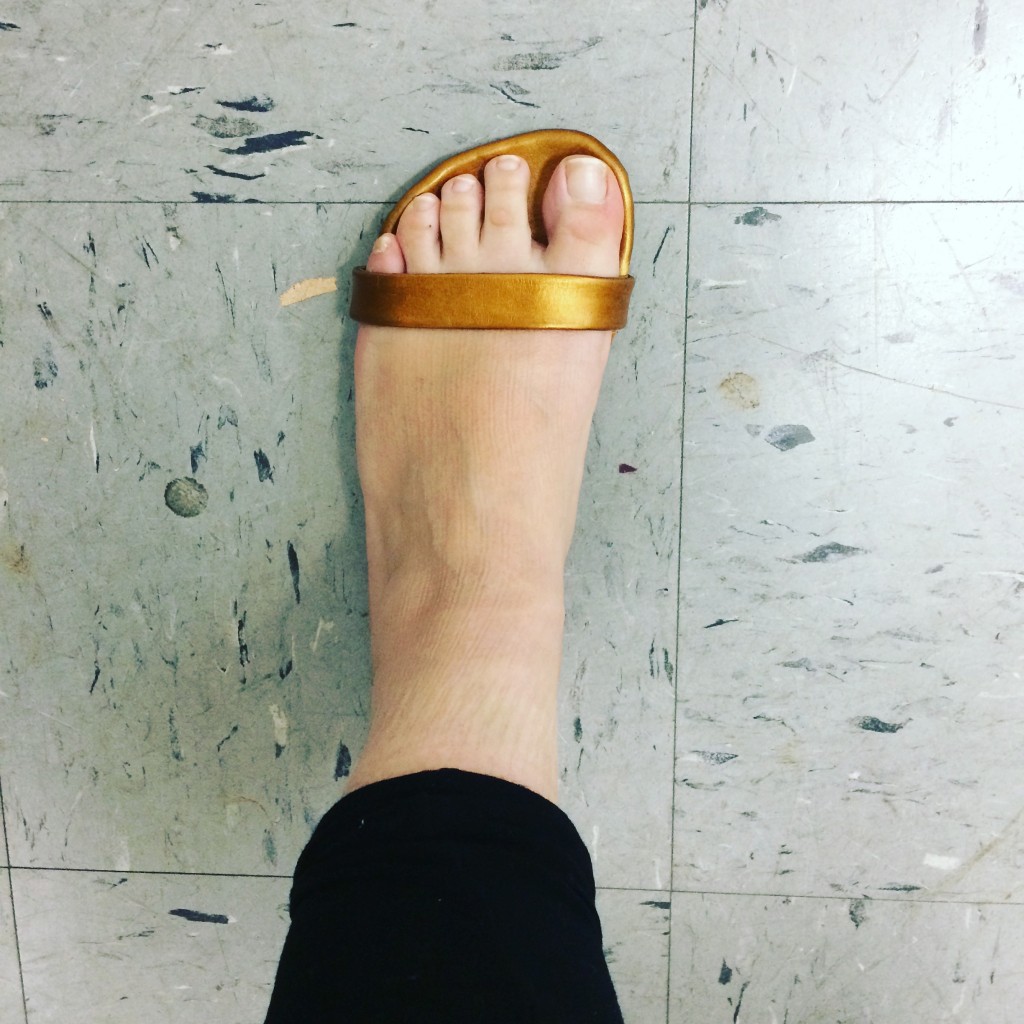
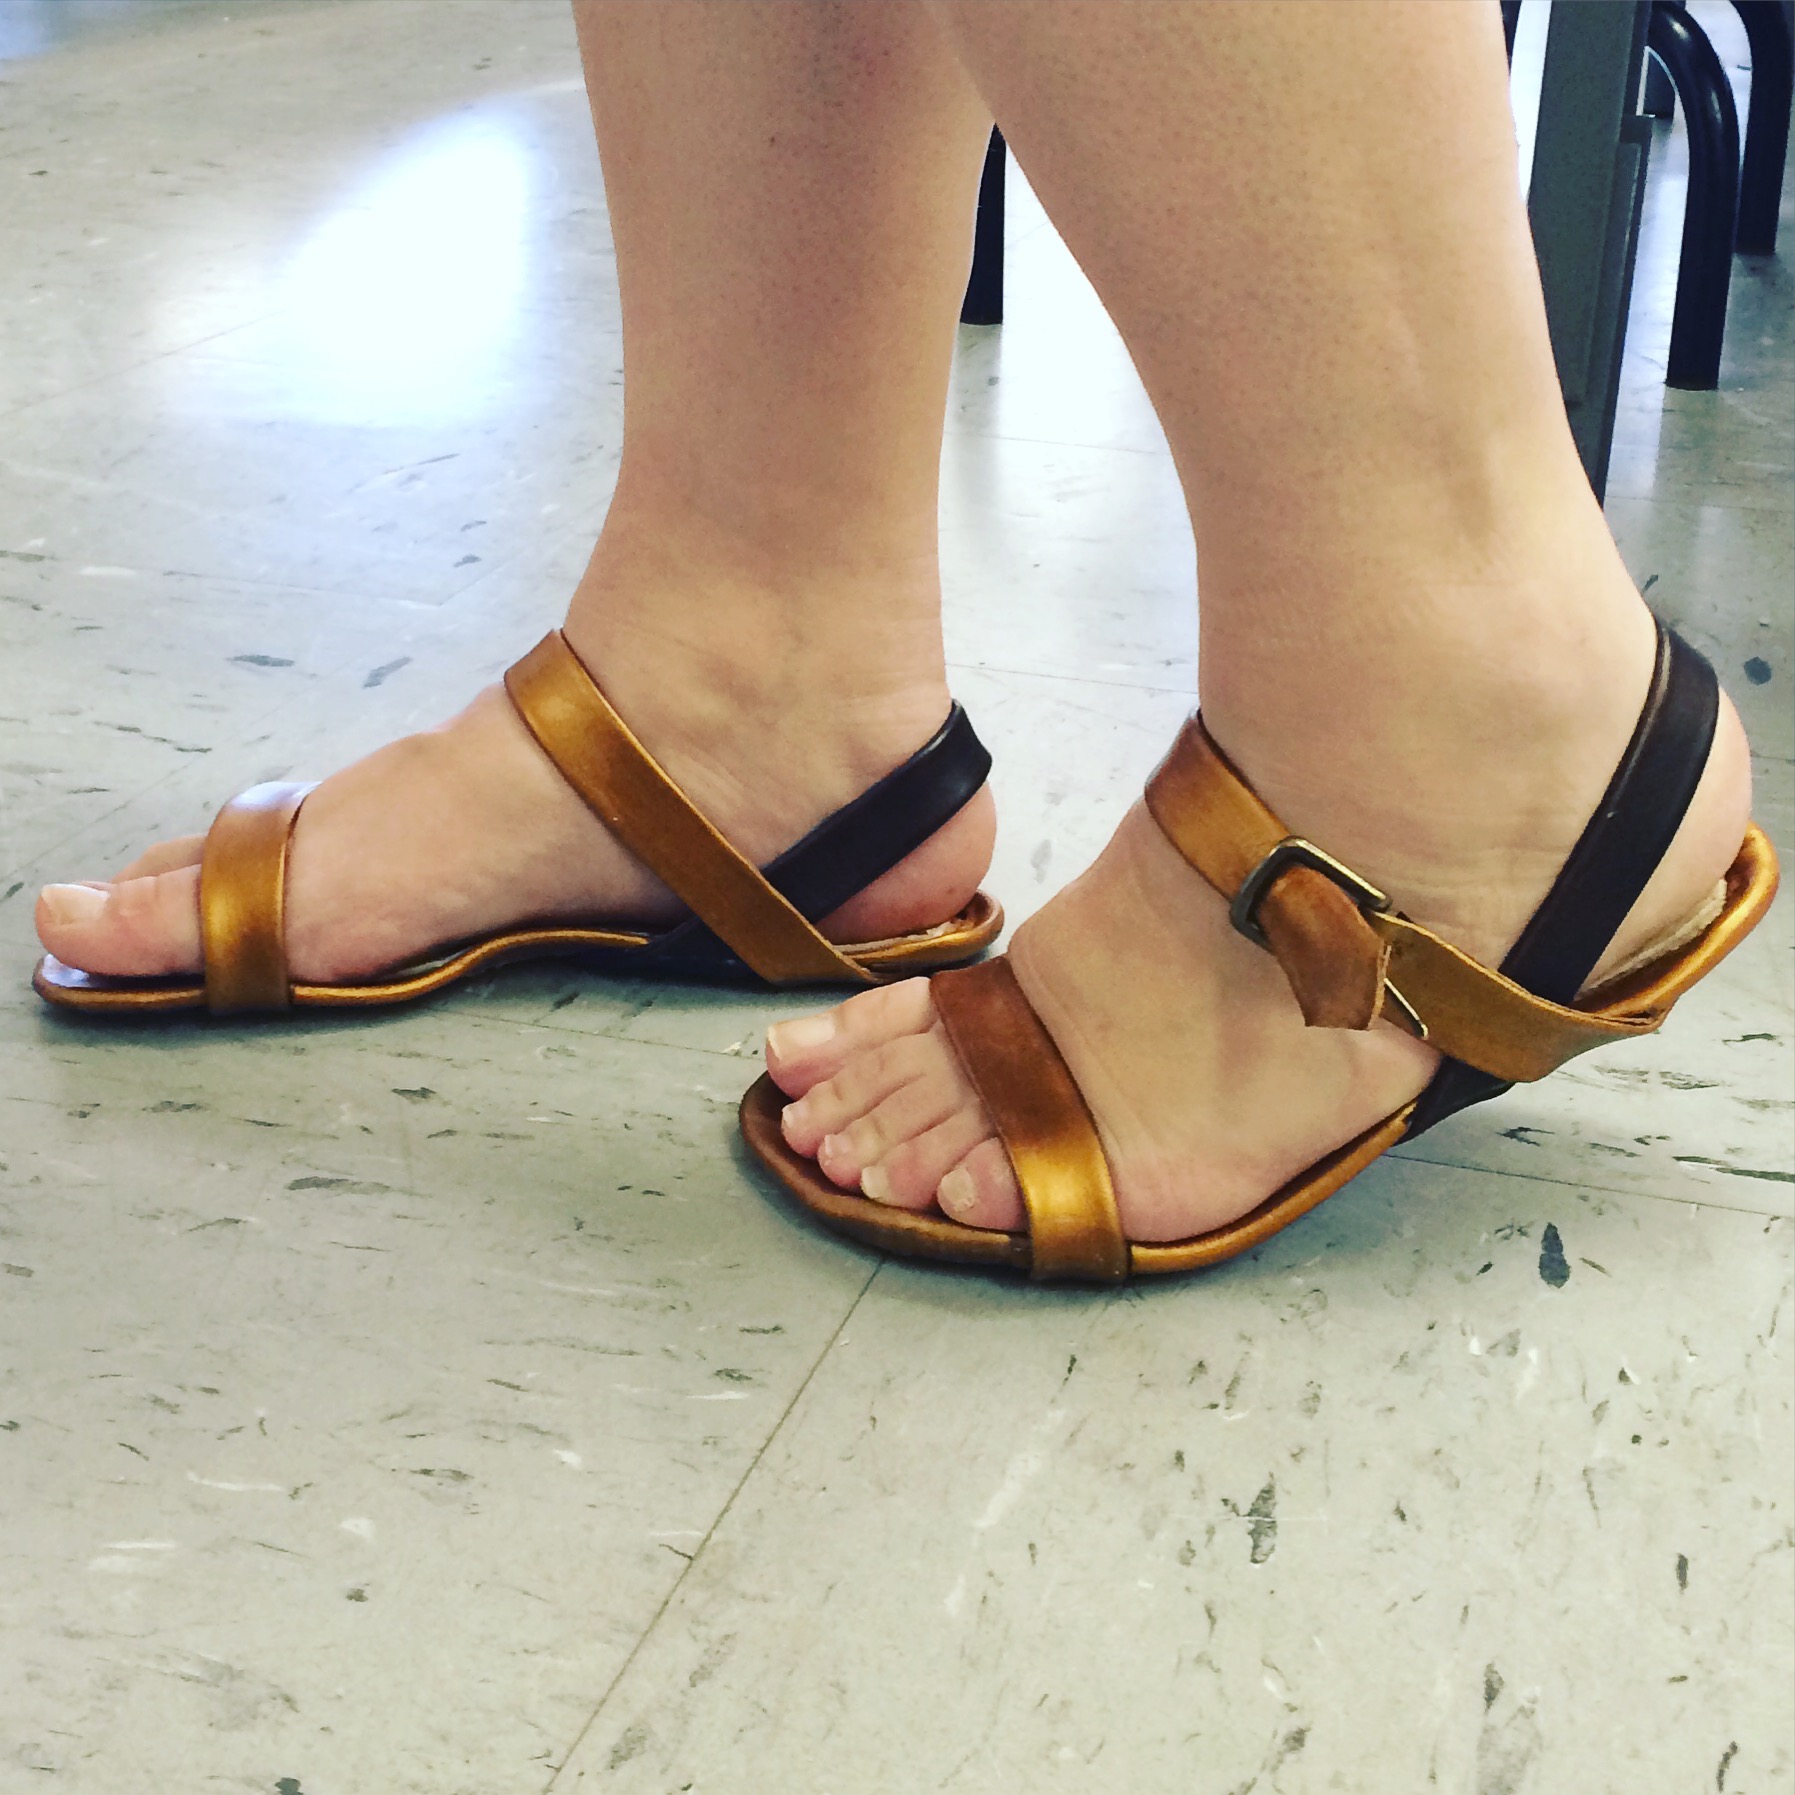
 Et voila! My entirely hand-made sandals! Honestly, they came out much better than I expected, and while I learned a *lot* which I’m sure would mean I’d do much better next time, these are surprisingly wearable for a first go.
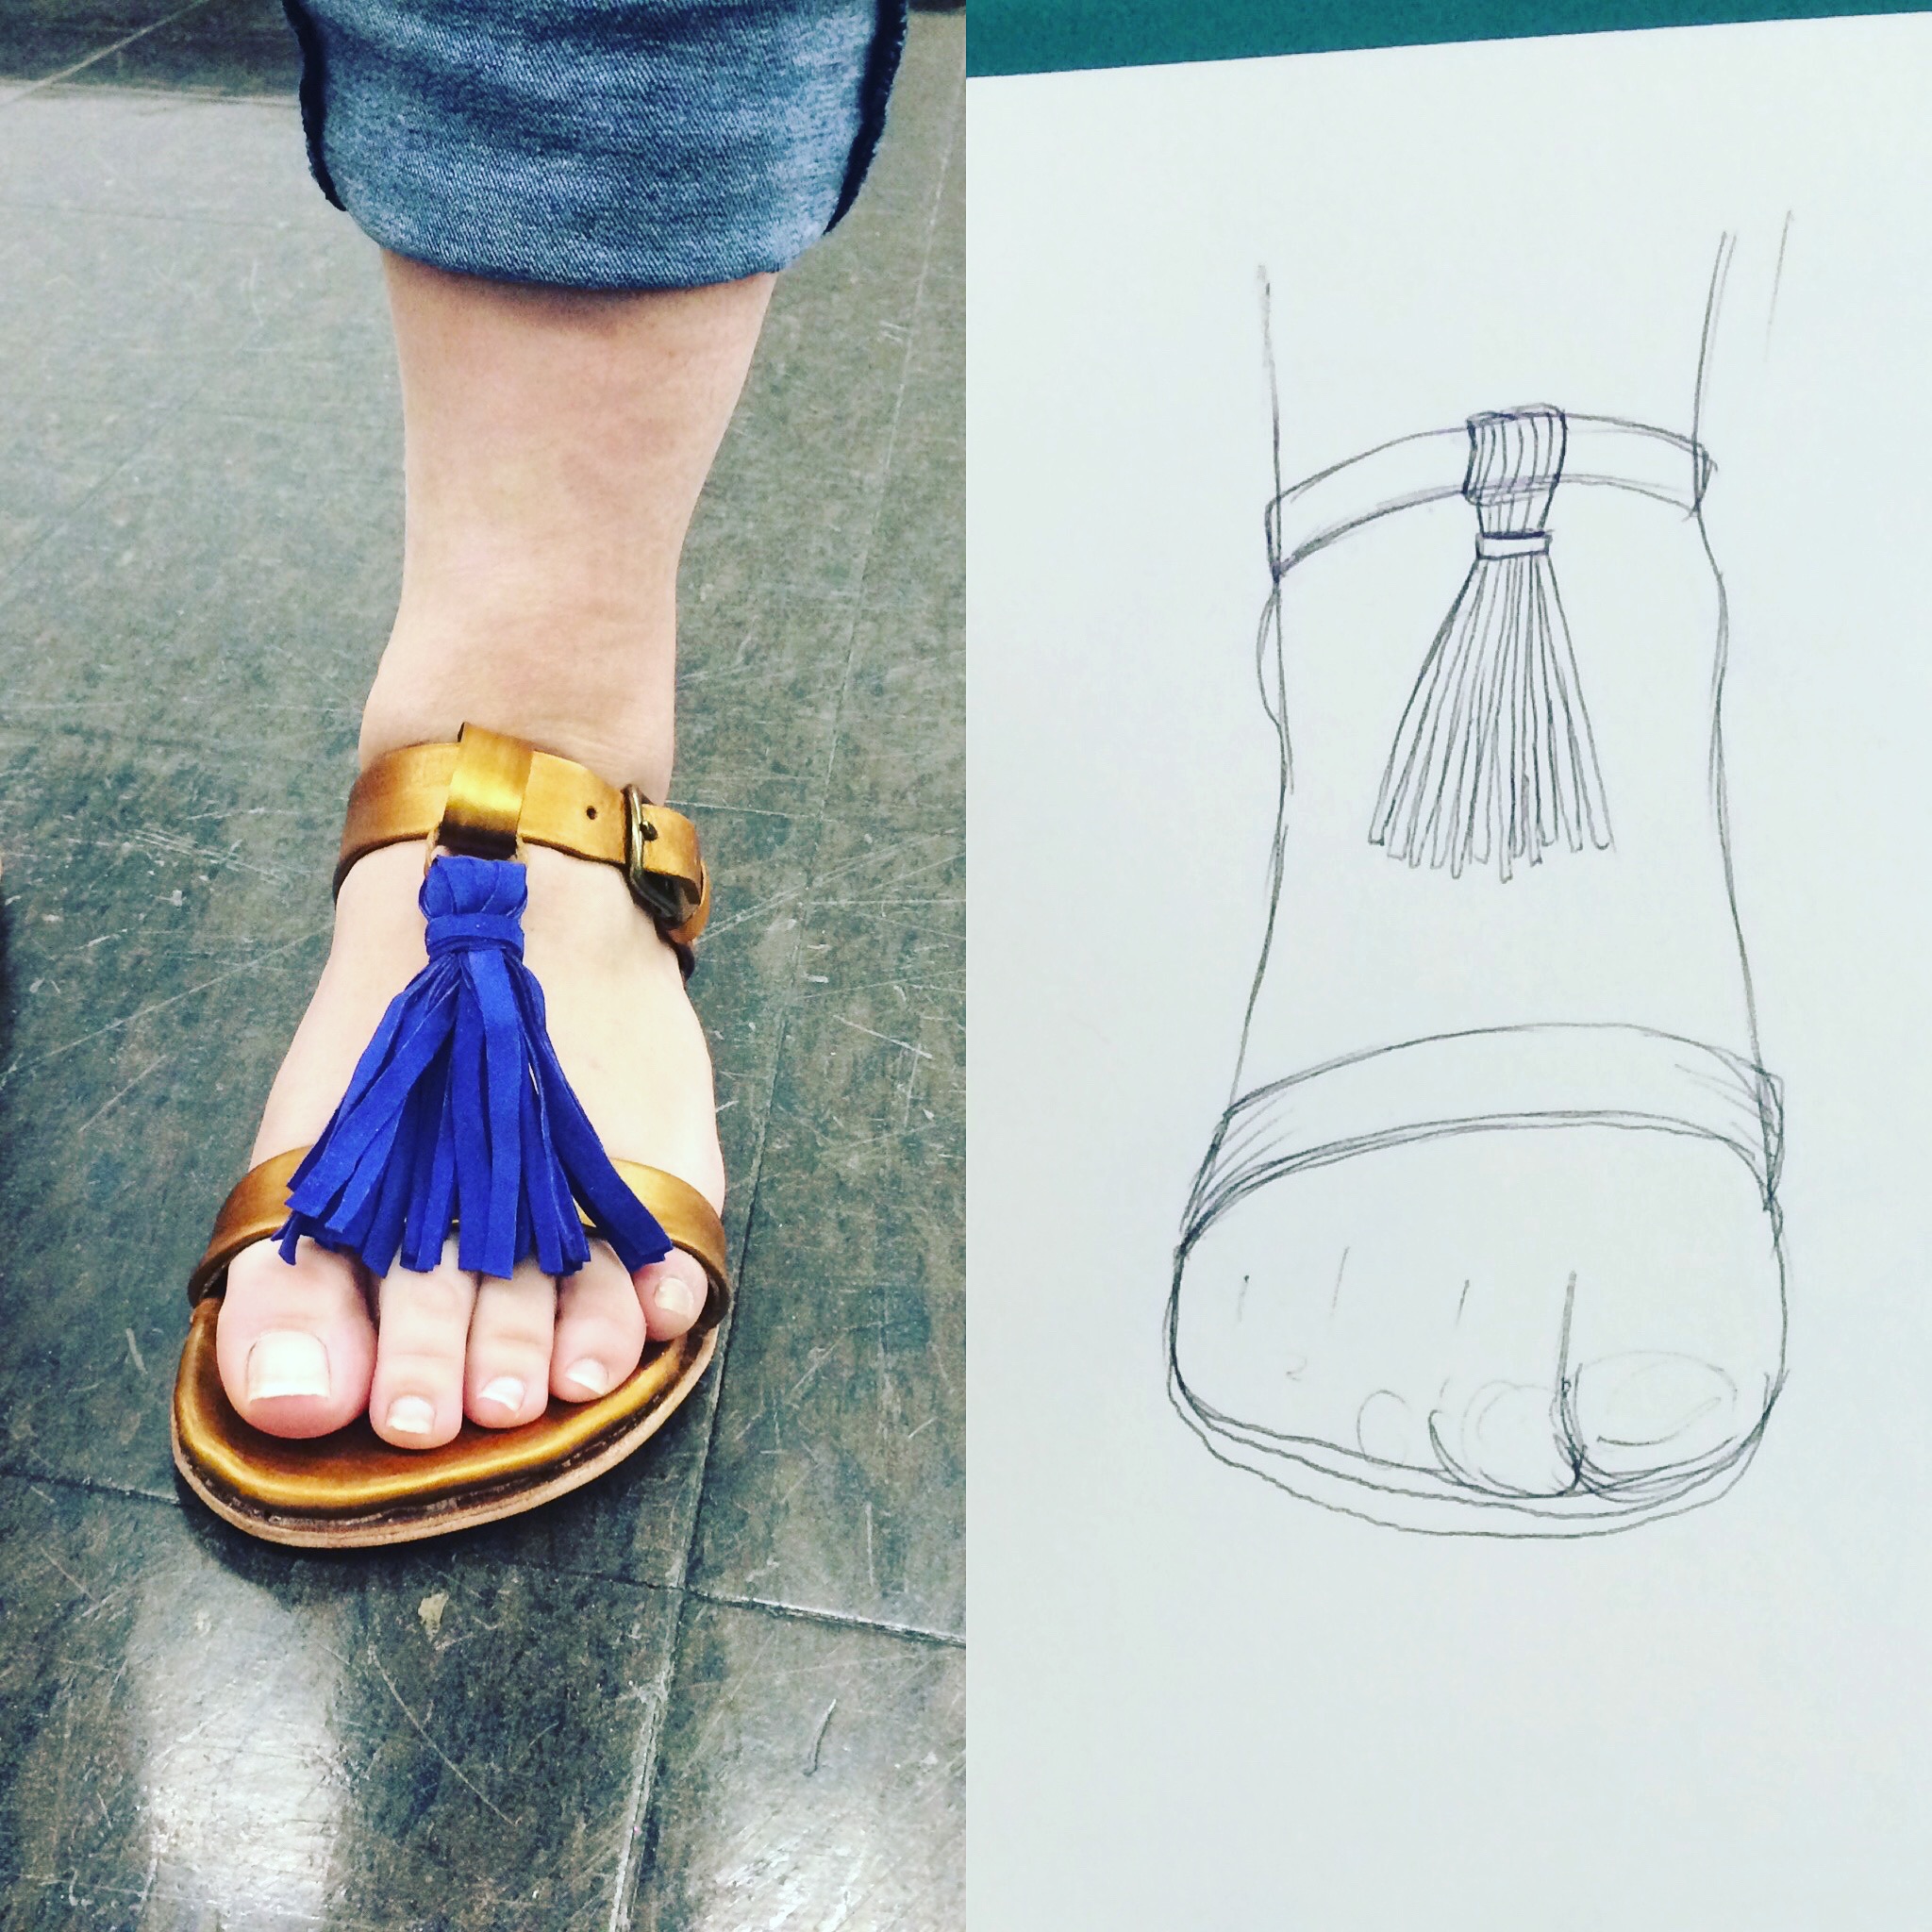
They even look quite a bit like my original sketch:
I left my sandal-making week totally exhausted but happy at having learned a new skill. Throughout the class, I was constantly comparing shoe-making with sewing, and here’s where I netted out:
Ways in which making shoes is like sewing clothes:
- Sewing! Well, personally I didn’t sew my sandals (IRONIC) but many of the other people in the class did, and accurate skills are clearly required.
- Seam allowances. They’re different, but the same concepts and processes basically apply, except for the fact you have to skive them all down… goodness knows if you had to do that in sewing I’m not sure I’d still be at it.
- Using dangerous stuff. I’m used to the Perils Of Sewing by now (haven’t chopped my finger off on a serger blade yet, but it’s only a matter of time) but the Perils of Sandal-Making were no less scary – razor blading things, using a *massive* pincer/saw cutter thing to cut the heavy leather, toxic glue. Man, we are adrenaline junkie crafters!
And… ways it’s not
- It’s physically hard work! No doubt that sewing can be tiring at times, but nothing compares to shoe making. It’s grueling!
- 3D design & construction. In many ways sewing is 3D, but most of us are used to using 2D flat patterns, and a lot of sewing is flat. Comparatively, shoe-making makes you think in 3D the entire time, and I enjoyed the process of “pattern drafting” directly on to my foot – in that way, it was a lot more like draping.
I’m looking forward to wearing my sandals this summer! And when people ask me where I got them, enjoying the bemused look on their faces when I say I made them. What other crafty hobbies do you think are great for sewists? I’m really keen to expand my skills and see if there are other things I can find that I’ll love as much as sewing!

so very cool! great inspiration! what a great job- thanks for sharing!! 🙂
Jenny, these sandals are really nice! How comfortable are they after you’ve worn them for a few hours? When we have craft markets and festivals here in Barbados, I always go to watch one of the leather workers making shoes and bags because their work is always so gorgeous. But you can see that it isn’t easy work at all. Quite a workout involved, aint it?
Hi Abbey – they are Ok… but I have super sensitive feet so for the first wearing they got a little uncomfortable after an hour or two. However I’m hoping they get broken in a bit!
So fabulous! I’d love to take a shoe making class someday. Maybe you’d like to take another class making leather bags or something of the like?
I wanted to try leather bag making ages ago – maybe even before I started sewing! I wonder if there are any classes in my area… I’ll check it out.
Hi Jenny love the sandals & Craftsy do a leather bag making course
They turned out fantastic! You could try calligraphy – I think there are some similarities such as the relaxing nature and the muscle memory you need to develop to get better. It’s cheap to get started with a little kit and you can learn from the internets or find a class.
Thanks Katie! I did try Calligraphy once and I really enjoyed it, but didn’t stick at it. I’ll check out online classes… It’s nice that it’s not too expensive, either.
Well done, they look lovely and you should be justifiably proud of your accomplishment.
How about weaving next? There’s many different ways. You could even start with fleece, washing and carding it then spinning it and weaving
I did this the Summer I was 13, gathering wool from fences on outings before getting some tatty bits of fleece from a farmer. Can’t remember now quite how I did the spinning but I know it involved a chopstick, a wired pebble and aching arms :~) I know you don’t have to have a spindle and 43 years later I still have that piece of woven wool, reminding me of a distant girlhood holiday in Cornwall in a Summer that never rained lol
Wow, spinning and then creating from that is definitely next level impressive!
These look amazing Jenny, hope they get mor comfortable as you wear them. What I would love to learn is fabric weaving, not many chances of doing that here in Athens though, does that sound interesting to you?
I’ve actually met a few people in my area who weave fabric, so maybe that’s something I’ll look into! When I was in Athens I was never aware of sewing/crafting classes, but my lack of Greek probably didn’t help that :#
Whoa. Dang gal, those are lovely! No ‘humble hands at home’ here. I tip my me-made hat (yes, another class) in your direction!
Ooh hats! Now that would be fun.
OMG they are freaking awesome!
They look awesome – congrats! I attempted to teach myself shoemaking last year but it was hard to know what to do and gather materials. I’ve recently started taking an online course at ShoeMakingCoursesOnline.com which has been mindblowing! Once you learn to make each type of shoe then you can take another course which teaches you how to frankenpattern any style of shoe imaginable just from working off all your basic patterns. Can’t wait to really get stuck into it. Hope you love wearing your handmade shoes!
Your documentation of this sandal making process is great. I think that there is one type of sewing where it’s a good idea to ‘skive’ the seam allowances: sewing with fur–real or fake. I usually trim off the fur so there’s less bulk, so maybe we need to start using this term to describe that process. LOVE your sandals, the design and the gold/black leather colors are perfect!
Those turned out fantastic! I fell down the fiber arts rabbit hole and learned how to spin yarn on a spindle. It’s taken some work, but I’m finally creating the kind of yarn I like to work with. Spinning, knitting, and sewing have really made me appreciate the clothes I have and the world I live in.
Wow, this is so cool! They look great, I think! Haha, enjoy the looks on people’s faces when you tell them you made them 😀
Love the shoes! Very stylish and empowering! I love all of your work and am always inspired by you. Tip for a new crafty hobby- try some modern quilting maybe… We have our first Cambridge Modern Quilt Guild meeting next weekend at Gather Here in Inman square. Lovely new hobby worth a try and a lovely group of ladies.
Those are so cool! I love the gold, and it’s so amazing that you made them wholly yourself!