
Hi everyone! Carrie here to get us started on our Lenox Shirtdress sewalong! This will be a bit of a longer sewalong than usual because there are many steps and some tricky bits in this pattern. If you find some roadblocks as you’re working through the construction, we recommend taking our Shirtmaking for Curves online workshop, as many of the same construction steps are covered there in much more detail with videos you can watch and rewatch as many times as you like!
Choosing your size
The first step in our sewalong is choosing your size in the Lenox Shirtdress. There are two measurement charts: one is the Body Measurement chart, and the other is the Finished Garment chart. The Body Measurement chart helps you choose your size based on what numbers you get when you measure your body with a tape measure – it has numbers for your bust (around the fullest part), waist and hip. The Finished Garment chart shows you the size of the actual sewn garment – the difference between that and the Body Measurement chart is called “ease”, and it’s the amount of extra room in the garment that the designer recommends for the clothes to fit well and allow movement.
Generally, you want to start by comparing your measurement with the body measurement chart. However, sometimes you might find that it looks like you’ll need to grade between sizes based on your measurements. When this is the case, taking a look at the finished garment measurement chart can help you decide when grading is actually necessary.
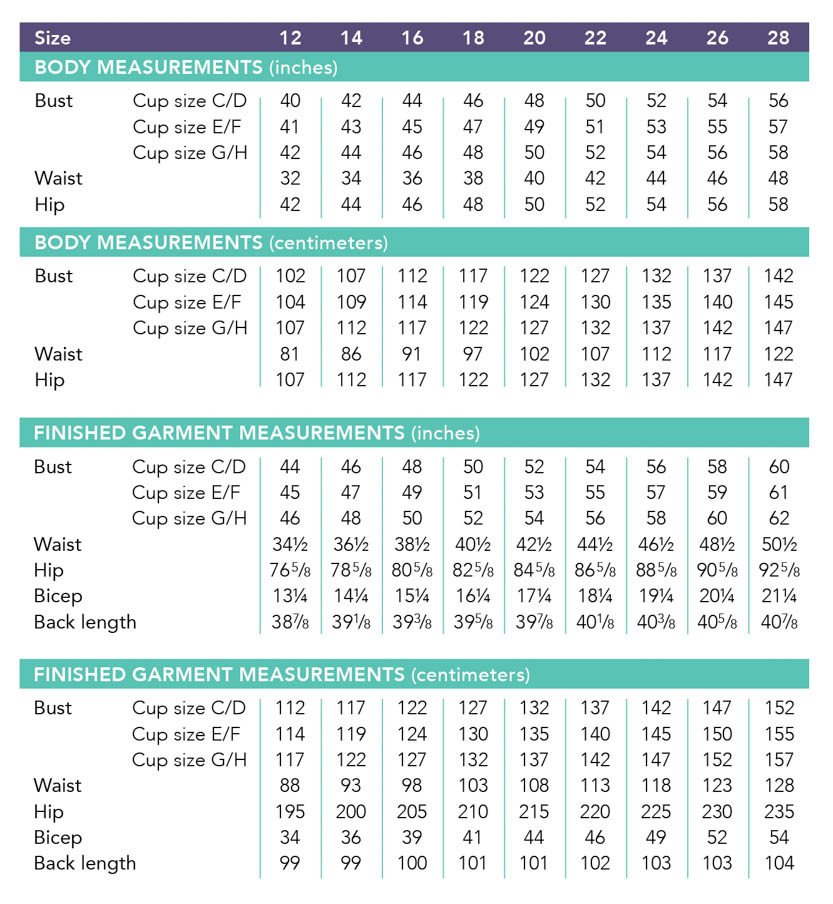
As with all Cashmerette Patterns, the best bet is to start with your bust measurement – you should use your full bust measurement, which is around the fullest part of your bust. Because of the cup sizing, you may find you could fit in two different bust sizes – in which case, you want to pick the overall size that’s closest to your waist size. So for instance, if your bust is 44″, you could theoretically be a 14 G/H or a 16 C/D. Which one should you pick? Take a look at the waist measurement – if yours is closer to 34″ (size 14), then go with the 14 G/H. If yours is closer to 36″ (size 16), then go with the 16 C/D.
Don’t fret if the cup size doesn’t match up with your bra size – there is so much variation in bra sizing that it’s not possible to perfectly line them up. Use your bust measurement and you’ll be fine.
Grading Between Sizes
Because of the shape and fit of the Lenox Shirtdress, you may find you need to grade between sizes. There is some positive ease in both the bust and the waist but not a whole lot so those are the most important measurements. The hips have significant positive ease, so as long as you’re within the range of the size chart, you won’t need to grade the hips. Let’s say you have measurements of 45″ at the full bust, 38″ at the waist (when sitting down…measure your waist when sitting down for this pattern so your buttons don’t end up straining when you move around!) and 52″ at the hip.
If you look at the body measurement chart, you’ll see your bust would fall in the 16 E/F, your waist would fall in the 18, and your hips would fall in the 22. Now let’s compare this with the finished garment measurements. Because the Lenox only has slight positive ease at the waist, we’ll want to grade the bodice from a 16 at the bust to an 18 at the waist. Then the waistband and skirt would both be cut at a straight size 18 because we still have plenty of positive ease in the hips.
The bodice has a princess seam, which makes grading a bit more complicated. When only grading between one or two sizes, it’s easiest to just change the side seams. If you look at the difference in finished garment measurements in our example, the 16 has a finished waist of 38.5″ and the 18 has a finished waist of 40.5″, with a difference of 2″. We want to add this 2″ to our 16 and the simplest way to do this is to add 0.5″ to the side seam of the side front and side back pieces (2 front sides + 2 back sides = .5 + .5 +.5 +.5 = 2). Add this width at the bottom of the piece and draw a new side seam curving from the notch down to the lower edge. The remainder of the bodice pieces can be cut at a straight size 16. For the button placket, cut the size 16 but with the length of the 20.
One thing to consider, if you’re making the pleated skirt, grading in this way will make it so the princess seams don’t line up with front pleats anymore. If this is something that will bother you, measure the distance from the center edge of the front center piece to the princess seam and use that distance as your pleat starting point on the skirt.
Preparing pattern and fabric
Now that we’ve chosen our size and graded if necessary, it’s time to prepare our pattern and fabric so that we’ll be all ready to sew next time!
Here’s your checklist:
- Wash and dry your fabric, to make sure it’s pre-shrunk and you’re not going to get any nasty surprises later!
- Press your fabric so it’s nice and flat. Check to see if you get any iron shine when you press the right side. If so, you’ll want to use a press cloth when pressing between steps.
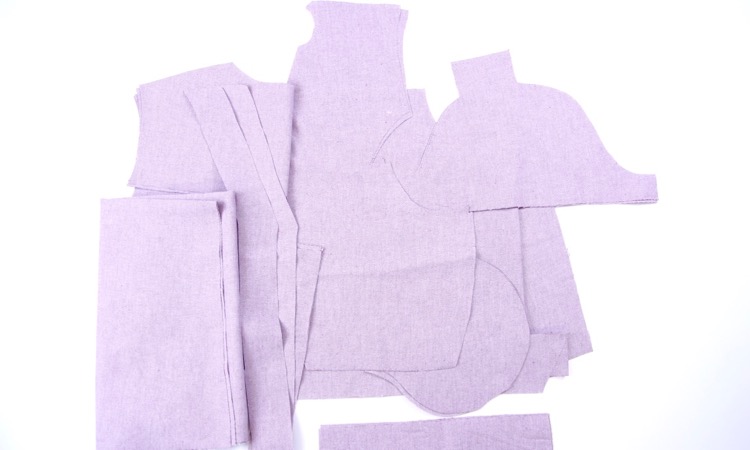
- If you’re using a printed pattern, either cut or trace off your pattern pieces – if you’re making adjustments or are going to make any dresses in other sizes in the future, I definitely recommend tracing.
- If you’re using a PDF pattern, you’ll need to print and assemble it. Here are some pointers to help you.
- Transfer all the markings to the fabric. For the notches, make a little snip into the fabric, within the seam allowance (so no more than 1/4″/6mm).
- Cut all pieces, following the layout diagrams in the pattern.
For the next step in our Lenox Shirtdress Sewalong, we’ll get started interfacing the necessary pieces and sewing the front and back princess seams. Share your progress with us using #LenoxShirtdress!
Very nice. Curious: what types of fabrics are recommended for this pattern?
We recommend light to medium-weight woven fabric such as rayon, voile, lawn or chambray. All the information about the pattern is available at the pattern listing.